| |
![]()
 2 or 3 Ply
2 or 3 Ply String
by Ron Harris
Next, you'll need to decide if you want to make a two ply or three ply string. A two ply string is made from two bundles of twisted strands while a three ply string uses three bundles. A two ply string is easier to make and for this article I have chosen to illustrate the two ply process.
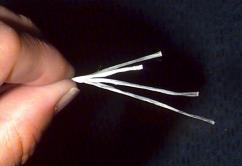
how many strands do you need for your bowstring 40 to 50 lb range 12 strands 50 to 70 lb range 14 strands 70 to 80 lb range 18 strands OK, lets say you have a 50 lb longbow, so we're going to make a 12 strand string. For a two ply string we'll need two bundles of 6 strands each or three bundles of 4 strands each for a three ply string. Grab you string jig and tie the end of the B-50 dacron string to the top left-hand nail. If your bow is 64 inches long, put the movable peg in the hole marked 64 and start winding the strands onto the jig until you have 6 strands of string on the jig. Cut the strands with a sharp knife or razor blade right down the center line between the top nails. Carefully pull the bundle off the jig making sure that the ends of the strings don't move. You'll notice that the ends of each strand is slightly shorter than the others as illustrated in Figure 3. Staggering the string ends helps to lock each strand in place as you make the bowstring loops. Set this bundle aside and repeat the process using a different color of B-50 dacron string.
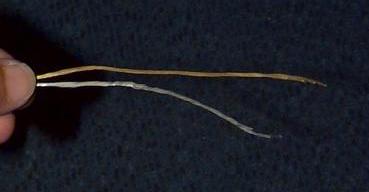
Wax both ends of each string bundle for about 10 inches. You may have to warm the wax so that it will stick to the strings. Use a candle or alcohol burner. Thoroughly work the wax into the bundles. Lay both bundles side by side so that the longest strand in each bundle is aligned with the other then lay the two bundles on the ruler you marked on your jig. Grasp both bundles about 7 inches back from the ends. Hold the bundles between your thumb and forefinger as shown below.
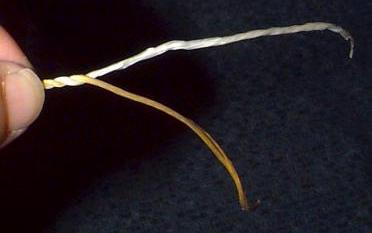
Using your other hand, twist the top bundle six or seven times in a counterclockwise direction (twist away from your body). Now take the twisted bundle and rotate it over the top of the bottom bundle (towards your body). The bottom bundle is now on top and vice versa. Keep repeating this twisting and rotating process until you have braided enough to form the loop for the top limb on your bow. The width of this loop will vary as does width of different bow limbs. The loop should be wide enough so that it will slide down the bow limb 5 or 6 inches when the bow is unstrung.
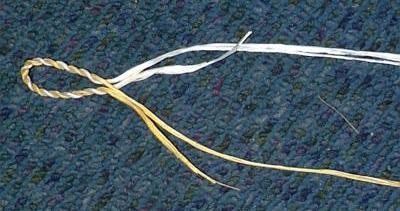
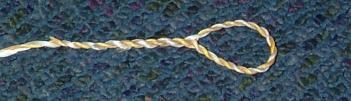
Form the loop as shown here. Make sure you align the bundles as shown (same color over same color). Grasp the bundles at the bottom of the loop and twist the two bundles of same color together. Here we show white twisted onto white forming one large white bundle and yellow twisted onto yellow forming one large yellow bundle.
Holding these two bundles between the thumb and forefinger, perform the same twisting and rotating process until the last tag end of the strings have been braided into the bow- string. Your finished loop should look like that shown below.
After finishing the top loop, separate both bundles all the way down to the bottom. Take your 7 inch measurement at the bottom of the bundles and repeat the whole process again just as you did when forming the top loop. When braiding the bottom loop you may have to stop occasionally to separate the bundles. The bottom loop has to be just wide enough to fit over the nocks on your bottom bow limb. Rather than forming a permanent braided bottom loop you can also choose to just braid about the last 8 to 10 inches of the bottom bundles and tie a timber hitch for your bottom loop.
Now that you have completed the loops you will need to put a twist into the bowstring. Make sure you twist the bowstring in the same direction as your braids otherwise you will untwist the loops. Put the string on your bow and adjust for proper brace height. Allow the string to stretch for a day or two or go out and shoot the bow. Remember to keep adjusting the brace height by twisting or untwisting the string until all the stretch has been worked out of the string. With your bow strung, mark the string about where you think your nocking point will be. Mark the string again about 2 inches above the nock point and 6 inches below the nock point. This 8 inch area of the string is where you will apply the monofilament serving. Put your spool of monofilament on the serving tool and pull a few inches of line out. Now is a good time to adjust the tension of the serving tool. You want the line to come off the server with some tension so that you get a tight wrap around the bowstring. Don't use too much tension or your serving could cut through the bowstring.
Separate the bowstring at either end of the serving area and insert about 1 inch of the monofilament line through the bowstring. Begin wrapping the monofilament around the bowstring while keeping the loose end under the serving wrap. Keep wrapping the monofilament around the bowstring until you are about 1/4 inch from the end of the serving area. Cut a 10 to 12 inch strand of the B-50 string. Fold the string back to form a loop at one end. Lay the string on the bowstring with the loop facing towards the end of the limb. Wrap the monofilament line over the dacron string about 6 to 8 more times. Keep these last few wraps a little loose. When you get to the end of the serving area pull a couple of inches of monofilament off the spool and cut the line. Cut the line and insert the end of the monofilament through the loop in the dacron string. Grasp the loose ends of the dacron string and pull them back under the last few wraps of monofilament. This will lock the end of the monofilament under those last wraps.
Now that the bowstring is finished give it a good waxing with a quality bowstring wax. Rub the wax in thoroughly using a piece of scrap leather. Rub it hard and fast so that the wax gets hot from friction and flows into the strands of the bowstring. Now, go out and enjoy shooting your bow, equipped with a string created by your own hands.